

My name is Alvaro Segura and I'm currently a Houdini FX Lead at MPC Los Angeles. I studied Graphic Design in Caracas, Venezuela, and 3 years of Game Simulation Programming in Los Angeles, California.
My Philosophy as an Artist
I have a deep passion for art and a constant hunger to contemplate it, decode it and understand it from different points of view. I crave to digest it and recreate it in my own universe as an FX Artist. Through my professional experience, I have learned to observe the apparent simplicities of daily phenomena and admire the complexities behind the forces that cause them.
I feel empathy with the Renaissance ideal of art, which involves research and knowledge. Thus, as part of my restless passion for the arts, I have developed a tremendous curiosity about science, technology, math and programming. I try to go beyond the mere human sensibility and organic intuition that an artist needs in order to create. Concepts such as vectors, matrices, boolean operations, mass, velocity, acceleration, temperature, forces, have become very attractive to me and are part of my routine as a FX Artist.
Have you ever wondered what Michelangelo and Leonardo da-Vinci would be doing if they were alive today? Very likely they would be collaborating on something like designing a sophisticated engine for spaceships. I have the conviction that art and science should coexist for the sacred purpose of bringing into existence the most beautiful creations. In Houdini, I have found the tool to reconcile art and science, creativity and technical knowledge, shapes and algorithms, artwork and simulations. Houdini allows me to tackle the creative process from multiple angles, while keeping up the discipline necessary to investigate solutions that go beyond simple intuition.
What makes a visual effect, a simulation or an image, perfect and jaw dropping? What are the algorithms behind the poetic aspect? How can I develop methods and disciplines to defeat limitations on the process of thinking and creating? Algorithms, poetry, thought, creation, are undoubtedly highly philosophical aspects. Athough I have not found the philosopher's stone, understanding these aspects has been a virtuous effort at every stage - despite the failures that I have often encountered in the path. While I continue to work as an FX Artist, I find myself obligated to develop a spirit of inquiry for every stage of FX Production, and at the same time for each operator and parameter in every Houdini context.
I dedicate a big part of my daily routine to learning more about anything available to improve my career, and I try to shape myself not only as a professional, but also as a human being.
Case Study: A Simple Fractal System Using VEX

Everybody knows how to connect points, but I encourage you to experiment a bit with the example shown above. Here I'm not actually connecting points, but procedurally building a growing network of connected lines. This is a great exercise to evaluate the power of VEX, while creating a simple setup that can evolve into a fractal system.
Let's start by adding a line sop in Houdini. Append a polyframe to create a tangent vector. The polyframe will create a point Normal and the “tangentu” attribute by default. Now add a wrangler node and type this code in the text editor:
Here's the simple vex to reorient the normal along the line direction:
@N=v@tangentu;
Bring a Sop Solver and connect the new wrangler node in the first input. Go inside the solver and bring another attribute wrangler node. Connect the “Prev_Frame” in the first input of the wrangler node. Now we will add a code that will compare the point numbers and will find the highest value. Since the highest value is always the last point, it will add a normal with a random orientation, and it will also create a new point along that direction. Then the sop solver will do iterations on this process, creating new points with random orientations on the normals. Let's keep going.
On the first attribute wrangler node we will use a function to set a “ptmax” attribute and to promote it to a detail attribute.
setdetailattrib(0, "ptmax", i@ptnum, "max");
setdetailattrib(0, "ptmin", i@ptnum-1, "set");
Add an attribute vop and use curl noise to change the normal orientation. Promote the offset parameter and add a $F on the Y value of the noise. Promote also the frequency. The $F on the offset will shift the frequency seed on Y, and move the normals randomly on every frame.
On a second wrangler node, add this code:
if(@ptmax==@ptnum) {
//noise amplitude
float namp= fit01(random(@ptnum), -6, 6);
//use this noise beside vop noise to randomly reorient normal
float xnoise=snoise(v@N.x)*@Frame;
float ynoise =snoise(v@N.y);
float znoise=anoise(v@N.z)*@Frame;
@N=set(xnoise, ynoise, znoise)*namp;
@N=normalize(v@N);
/*add new point along normal direction. The normalize function will set the length of the normal on a range of 0 to 1.
Multiplying by 1.25 will increase the distance of the new point.*/
i@newpnt = addpoint(0, v@P+normalize(v@N)*1.25);
}
Third wrangler will be a simple conditional statement to add normal to the newly created point. A loop for iterations is also created. You can change the value of the operation i<5, to have different results. Play with that and check yourself.
//if normal equals zero, add normal
if(@N==0){
@N = normalize(v@P);
}
for(int i=@ptnum; i <5; i++){
@ptmax=@ptnum;
}
Now go up to your geometry level where the original line is, and append an “add” sop to connect the points. Here's what you will get:
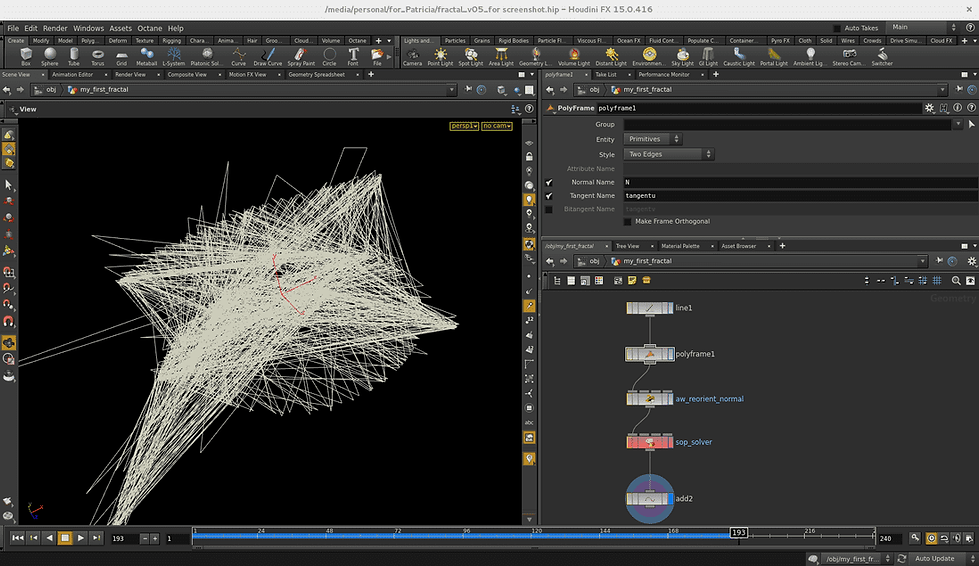
This simple VEX code with only four nodes in the system, represents the flexibility of Houdini, and the beauty of mixing art with simple math to achieve amazing results. I'm new to VEX, but I'm learning it and adopting it as part of my Houdini skills. Something like this would require a lot of operators, but wrangler simplifies and accelerates the process of production along with (sometimes exponentially) faster computation time.
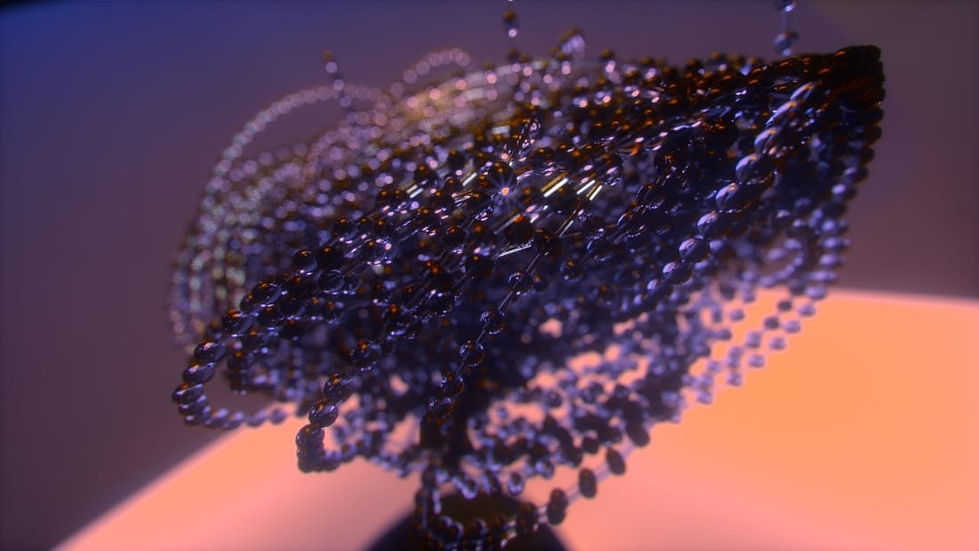
The following two images were created with little variations of the code. Copy sop can be used to add spheres on every point. Just hit play on the timeline and let the lines grow by themselves.


The image below shows a little variation on the code that represents one step further towards the development of a more complex fractal system.
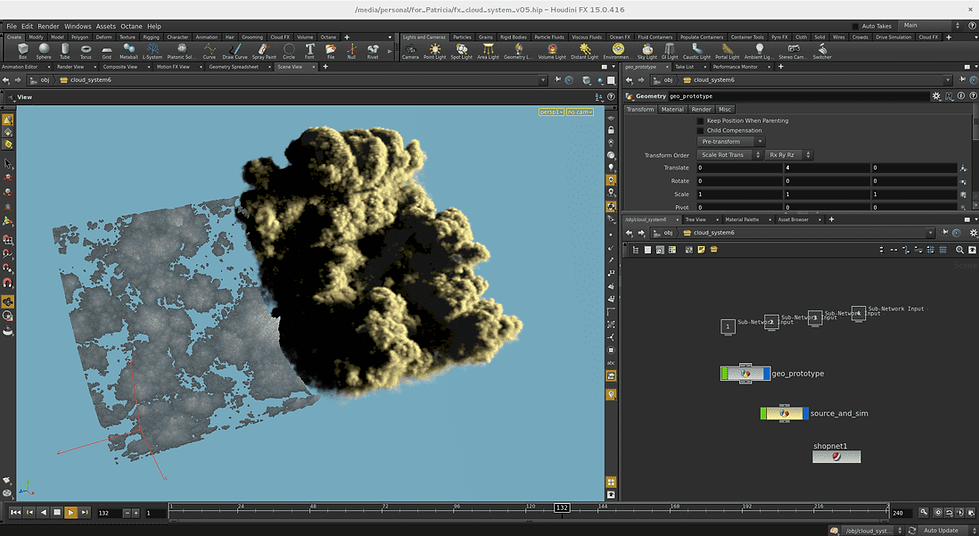
Case Study 2: A Cloud System
Here's an example of a cloud system I'm currently developing for MPC Los Angeles, as part of our tools set:

And here are some screen-shots and images to show the breakdown of the process:

The system starts with a grid, but can be used with any type of geometry. Use scatter points, and displace them using normals and different types of noise. You can create gaps by biasing the luminance value and blast the darker areas.
You can create point velocity based on Normals, and density values based on pscale and color. You can use “fluid source” or “volume rasterize points” at sop level, to generate density and velocity volumes.
Then you can send these two attributes to dop and use a pyro or smokesolver, depending on your preferences. Feel free to experiment in dop with different gas micros-solvers. For example Gas Disturbance, and Gas Turbulence.


When you do clouds, the scattering value is very important. So play with your shader scattering value to get an adequate volume absorption of light that is common in clouds. In the examples above, you can see different render results with different scattering values.
The importance of a Good Team
I currently work at MPC Los Angeles, where I have the opportunity to work with amazing CG Supervisors, VFX Supervisors, Creative Directors, Lighters, and Compositors. We are a team capable of facing all kind of challenges and deliver state of the art results on schedule. The FX department consists of a group of Houdini artists with clear objectives, impeccable communication, outstanding support and mutual trust.
On a more personal note, I've tried to extract something relevant from every studio I have worked with in order to grow my skill set. Sometimes through great success and sometimes through failure, I have progressively built up my own arsenal of ideas, styles and tools. My professional growth has been largely shaped by the opportunity to work with remarkable Houdini and FX artists. In that context, I’d like to thank Todd Dufour, Peter Claes and Stephen Wood, who have my special admiration.
Alvaro Segura 2016
By: Patricia Cornet
GridMarkets marketing