
Featured Artist: Adam Swaab, Los Angeles
I’m Adam Swaab, a Creative Director and Technical Director based in Los Angeles. Since 2001, I have worked in television and film, spending the last 6 years almost completely working in Houdini. I specialize in visual fx combined with live-action, with a design aesthetic.
A little about me, before getting into the world of Houdini… My background is in design, motion graphics, and filmmaking. I spent four years at Blur Studio, as part of the Motion Graphics division. From there, I spent a few years at design juggernaut Prologue, working on film titles and effects, as well as motion graphics show packages. I am currently a Creative Director at Wolf & Crow, in Los Angeles, where I oversee a wide variety of commercial and film projects. Through these years, I spent a great deal of time with 3DS Max, Cinema 4D, and finally, Houdini. Houdini is where I feel most comfortable, and is the tool I choose to do the type of work that interests me.
I recently gave a presentation for SideFX of my work in Houdini, which falls into a category I call design-based visual effects. I’d like to sum up some of the ideas of that talk and speak about how Houdini enables me to express myself in ways no other 3D program can. I’d also like to talk about my strategies for creating work, which I think will have value to other creators and vfx artists, regardless of which tool you use.

Highly simplified & abridged venn diagram of various parts of motion graphics and visual effects
First off, when I say “design-based visual effects,” to what am I referring? In the Venn diagram of CG design, I put motion graphics into one sphere and visual effects in another. Where these spheres intersect is this landscape I speak of. On the one hand, we have interesting typography experiments, graphic design in motion, non-photoreal effects, etc. On the other, we have the world of rigid bodies, fluid sims, explosions, and the things found in the typical effects pipeline. This middle area takes the best of both of these worlds and creates interesting and dynamic work. When we give a designer the tools of a visual effects artist, or we give a visual effects artist a designer’s eye, we enable design-based visual effects.

(A reinterpretation of vector field visualizations of a smoke simulation for the Wolf & Crow reel opener)
A designer might take the idea of flowing water or an explosion, for example, as a starting point, but that is never the end. The designer will twist and turn it and use it as the backbone for creating a completely new kind of effect or visual expression. The goal is not to recreate nature, but to use natural phenomena to create a new reality. The designer may also choose to exploit areas of the program that were not meant to be an end product (such as vector field visualizations) and “trick them out” to create compelling effects.
There is also the part of the visual effects pipeline that exists outside the world of explosions and simulations that falls into this category. We have areas such as procedural geometry generation, object manipulation and procedural shading, for example. I put these types of effects into design-based visual effects, as well.

Procedural environments & graphics created for "Ora."

Terrain and character effects generated in Houdini for the movie, “Pan.”

Procedural assets and environments created for "Spyder."
So, why do I use Houdini? What is it about this tool that enables my work? First, I want to say that when it comes to software, I am not a fanboy or a blind advocate of any one piece of software. Ultimately, each artist must ask whether to tool he is using works for him and for the task he is doing. Each tool has strengths and weaknesses, and no tool is perfect. And, I would advise artists to continue to search out new tools and new approaches to creating work. As they say, “When all you have is a hammer, every problem looks like a nail.”
I think of Houdini as a way to build processes, rather than building objects. For example, in Houdini, you don’t model a chair. You create a system or process for making a chair. You don’t think about the end result as being immutable, but rather something that can and should be open to further exploration and art direction. To me, this is liberating, as the end result is not defined at the start. Rather, we only need to design the process to get there. In other words, we build the map, but the destination is never preordained.
Houdini, in its procedural approach, matches my way of thinking and breaking down problems while allowing me design flexibility and the ability to easily experiment and iterate through ideas and concepts. The node-based non-destructive workflow is extremely important here. Nodes allow me to isolate sections of my process, continuing to refine and optimize, all while maintaining the whole. I can logically see the steps that go into creating something and branch off or fetch geometry from any step in the process to further act upon. This allows me to easily create complex systems that are dynamic and procedural.
Most of the tools in Houdini are simply encapsulations of a bunch of other tools. Yes, there are some black boxes, but a great deal of Houdini is open for modification. I can take the default fluid solvers and add my own functionality to them, creating some new behavior that does not currently exist in the software. I can cannibalize solvers to create a completely new solver. And I can do all of this with only a rudimentary understanding of coding and computer graphics. My focus always is to be an artist and not a programmer.
I’d like to now take some time to talk about my overall process for tackling projects that require a blend of design and technical direction. This process is generalized, and software agnostic. I think it provides a good basis for designing and building unique visual effects, and it has served me well over the years. The methodology is as follows:
-
Concept
-
Reference
-
Previs
-
Prototype
-
Build
-
Execute and iterate
The concept phase is used to analytically arrive at a goal for the project or effect. I usually start by writing out (or keeping in my mind) the key points of interest for an effect or project I want to build. Here, I gather ideas from all mediums. It can be anything - a word, an image, an emotion. The idea here is to find ideas, elements, and images that inspire me. Even though we are producing a visual piece, I love having a soundtrack in mind, or a moodboard of images that convey the emotion of the piece. I find that this is the time to play. Ask yourself “what if” questions in this stage. This is the place for experimentation and discovery.

We can also make a distinction at this stage about two types of design. I think of design as either process-based or result-based. Process-based design focuses more on the process of making something (Jackson Pollock, Cy Twombly, etc.). i.e., the process is the art, and the result is somewhat incidental (Houdini users might recognize this as “Generative Art”.) This type of design focuses on the rules that create the design, be they intricate particle systems, space colonization algorithms, etc. Result-based design uses process as a means to an end (any number of figurative painters qualify here). Here, the final product is the only relevant part of the equation. Both of these have their merits, and I love that Houdini allows me to embrace each of these strategies.
The reference phase is the place to gather visual material to help decide how the effect or project should appear as realized on the screen. It is also the place to collate technical information and strategies that may be useful. Reference is not just about the way something looks, but also how it makes you feel. I love to gather massive amounts of reference, putting them into categorized folders, and then selecting the best and most relevant images to pin in a special location. It is important to understand why a reference grabs you in a particular way. Is it the lighting? The contrast? The timing of particular elements or shapes that you see? Is there something about the composition? Understanding why you are attracted to your reference is a key point understanding the reference as a whole. While I am making a piece, I continue to check back in with my references to see if I am hitting the mark or straying too far.
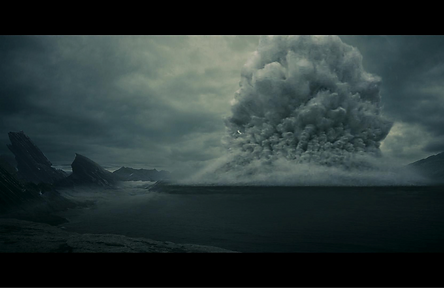
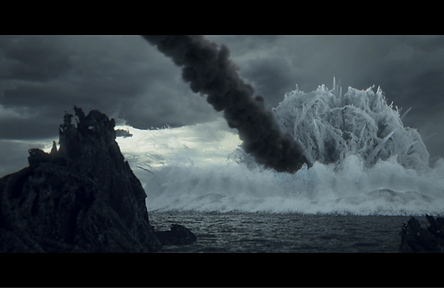
(Some reference images I gathered during the concept phase of my “Melt” piece)
Previsualization is where I create small frames or motion tests to help me in the design process. These can be fully realized concept frames, small thumbnails, or little motion experiments. I don’t think of these tests as something that needs to be 100% accurate and reflect the exact final product. I leave a lot of room for flexibility here. For me, this is a blueprint or a map. It gives me a direction to follow, and it keeps me from spinning my wheels during production time. The main things I am trying to achieve in this stage are mood, tone, lighting, and composition. The specifics are not as important as the larger generalities. It’s about selling an idea here, not an execution.
(Concept frame for a shot in my short film)
(Final render of shot)
At this point, and sometimes during the previsualization stage, I begin prototyping my design. This is what we call a proof of concept. Again, we are not creating a final product here. We are using this stage as a testing ground to determine the viability of our proposed solution to the problem without a huge time investment. Ideally, a prototype can be developed in two or three days, maximum. Optimally, it is less an a day. The way I tackle this is to write out my requirements for the shot or tool. Once I understand the requirements, I will break them down further into micro tools or requirements that are needed. This allows me to build a prototype step by step or problem by problem, rather than being overwhelmed by the larger problem. By doing this rapidly, I can find out what is working and what is not working about my solution. I can then see either pitfalls to avoid or places where I need to invest in more thinking. Sometimes, I entirely scrap my work and have to take a brand new approach. The important point here is to allow for flexibility of thinking and adaptation to problem solving.
(Proof of concept for an effect in my short film)
(Final shot, based on the proof of concept test)
When I am comfortable with my prototype, I enter the build stage. This is where I commit to my prototype and do a full-fledged build of tools and assets. During this build stage, I start by asking myself what is the input and output of the tool I am building. What kinds of parameters do I need to have control over? What can be automated, and what must be art-directed? I have a kind of rule of thumb I like to follow for weighting this question. I like a 70:30 ratio. 70% of the process is automated, and 30% is fully directable. This is a ratio I have arrived at through years of working, and it matches my level of control I feel is necessary. I don’t want to micromanage every small detail in my scene, both for reasons of efficiency and what I’ll call “personal laziness” on my part. I tend to think more impressionistically. If the big picture is working, then the smaller details become far less important. Of course, there will always be small areas that need customization and attention. But, time is finite, and resources are finite, and shots must be completed.
Which leads me into the final stage, execution and iteration. Because of all the previous work, creating a plan of action, prototyping, developing tools, making tests, etc., we now only have the grunt work of turning our hard work into a developed shot or piece. This stage is much less about creativity and problem solving, and more about “getting it done.” This is the place to reacquaint yourself with your reference and bring your most critical eye to the process. Take your work as far as you can take it, make it as perfect as you can. Be sure you have done your best, and then look for feedback from other artists. It is important to take a step back from the work for little bits here or get some outside opinions. Others will see things you did not see. They will have suggestions you never thought of. They will see the weaknesses you hoped would go unnoticed. This gives you an opportunity to see where you are succeeding and where you are not succeeding before calling a piece “done.”
Is there ever a “done?” I have had this conversation with many other directors and designers, and I have yet to hear anyone say yes. We simply run out of time or energy or resources. We can always do better, always find fault in the work, and always list the compromises we had to make to get the job done. This is reality, but it is not a bad thing. We simply must decide when it is time to let go and move on to other challenges. I believe this is the nature of making art.
While entire books can be written on this topic and on creating work in Houdini, I hope that this short article is able to give you some guidance and direction to help take your work to the next level. Keep experimenting, playing, and pushing as many boundaries as you can. Hopefully, the strategies I laid out here will help you take your work to the next level!
Adam Swaab 2016
By: Patricia Cornet
GridMarkets marketing