

Hello everyone!
I am a motion designer and coder. I got my start working with some of the most talented Chinese designers in Shanghai. From Shanghai, I relocated to London to join the Moving Picture Company (MPC). This was a chance for me to jump out of my comfort zone and to experiment with new creative tools and ideas. My career started with Cinema 4D. But, as my skills and creative ambitions grew - I found that I had outgrown Cinema 4D. So, I moved on to using Houdini. Today, I have embraced both Cinema 4D and Houdini - a combination that has proven very powerful and enabling for me.
GridMarkets thought that my journey and experiences would be of interest to its community . . . so I agreed to share them here. I wish someone had told me earlier in my career about the many Houdini vs. Cinema 4D differences that I have experienced. No doubt, I would have saved a lot of time and effort.
Like most people, Cinema 4D was my first stop for making 3D motion graphics. It has a well designed user interface, which makes it easy to move in viewports. MoGraph is powerful and versatile - and will work well with many types of animation challenges. Timeline provides very sophisticated built-in controls - which I really like.
But, after 3 years of using Cinema 4D, I felt like I had hit a ceiling. To be fair, Cinema 4D can be made to do many things. But the ideas that I was aiming to implement required days of patient technical configuration. I found myself spending more time on technical configuring than on visually creating. This was when I started to explore Houdini - which has since become one of my favorite artistic weapons.
So, let’s start with the question that I get asked the most by Cinema 4D users: When is it a good time to start exploring Houdini and making the investment to learn it? It is always a good idea to be familiar with new and promising tools. As for when to seriously consider making a switch, I would say, keep using Cinema 4D if meets your needs. But if using Cinema 4D limits your performance and your ability to implement your artistic vision, then consider either extending Cinema 4D’s capabilities or making the move to Houdini. I did both.
As for extending Cinema 4Ds capabilities, there are only two main options (without considering Cpp SDK): XPresso and Python. Unfortunately, both have shortcomings that might annoy you.

A typical somewhat complex XPresso rig
XPresso: XPresso is Cinema 4D's node system and visual programming language that provides a mixed environment that permits point-level manipulation, accessing and modifying data in MoGraph module, and provides an antique version of Thinking Particles. Unfortunately, it doesn't provide enough utility nodes to help users accomplish their goals efficiently (e.g. looking for the nearest point to a specific position in space). Control flows and looping are crippled. Priority is hard to manage and even unsolvable (without making everything editable and baking keyframes). What's more, it's single-threaded which can be a real pain when you need to quickly manipulate massive amounts of objects and points.
Python: Python isn't fast or parallel in Cinema 4D. Also, Cinema 4D's Python SDK isn't really that robust; there typically is a lot to build from the ground up before you can actually start working on the object the way you would like.
It is because of these limitations that I decided to make the investment into learning Houdini. What did I discover?
First, if you are a fan of XPresso, you will quickly fall in love with Houdini's VOP (stands for VEX Operators) network. It is as easy and familiar to use as XPresso, but just much better. Let me explain with an example.
In XPresso, you can manipulate objects, points, Mograph and etc., where all kinds of operations are mixed up together. With Houdini’s VOP, you can only run the VOP network on one of four levels of an object: vertex, points, prims (equal to faces most of the time) and details (object itself). VOP provides many useful prebuilt functions that enable you to conveniently access object data. It's also multi-threaded and extremely fast with featured-film-proven-scalability.
Also, if you're manipulating an editable object's points in XPresso, you need to be very careful - if you wire the wrong ports (or just bring on the position input), your object might be irreversibly destroyed if you don't have a backup copy, and Ctrl + z can't save you either!
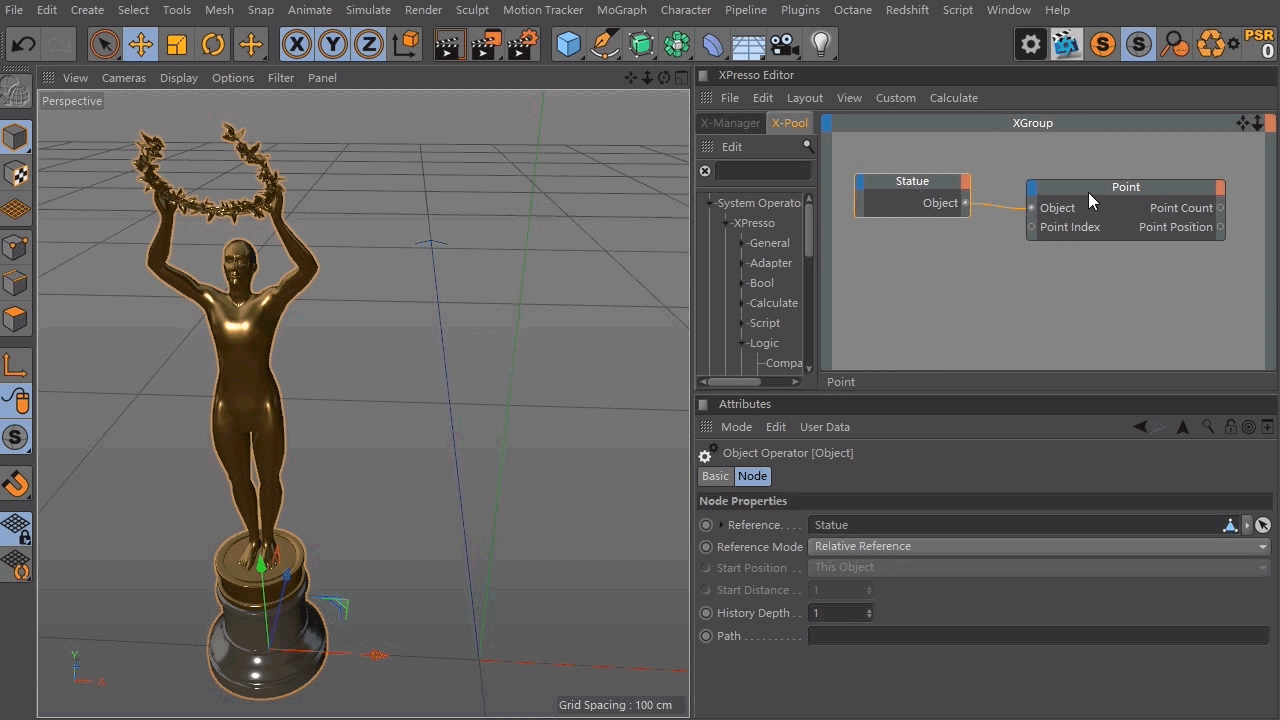
(WARNING: Performed by trained professional, DON'T TRY THIS AT HOME)
With VOP, you will never destroy your object irreversibly in Houdini, because it's fully procedural. We will get into that later.
Second, Houdini has a programming language called VEX, dedicated for manipulating objects (Python in Houdini is typically used for pipeline development, rather than object modification). VEX and VOP are actually the same: VOP is just a visual version of VEX, where all the functions are packed into graphical nodes, and each node contains a snippet of VEX code. If you right-click a VOP, its VEX code will appear. So, VEX has all the performance perks of VOP and more.
The power of VEX became obvious to me from the following experience. It took me an entire month to develop a Cinema 4D plugin named NetCreator (www.behance.net/gallery/38292207/NetCreator-v11-Cinema-4D-plugin). NetCreator functions to build splines by connecting different points. To create the same capability with Houdini, it takes one minute and one built-in node AND the Houdini solution calculates a hundred times faster than the Cinema 4D solution. Also, if I want to create a more powerful version of it with VEX, it won’t take hours to do with Houdini.

My first R&D with VEX: a knitting effect prepared for my first showreel. All the threads are real, there is no visual trick to fake anything!
Let's dig a little deeper now into differences between Houdini and Cinema 4D - by taking a look at the core concept of non-destructive workflows. Let's say you want to make something like the picture below. In Cinema 4D, you need a Cube object and three appended deformers, which are executed one by one.

Cinema 4D deformer
In Houdini, you make one box node and another three nodes connected one by one.

Houdini deformer
You might ask, they are both very straight-forward, how is that much different? Well, in Cinema 4D, what you are adding to the scene is one primitive POLYGON object and three DEFORMERS. In Houdini, there are 4 SOP (Surface Operators) NODES.
In Cinema 4D, polygon objects contain the definition of polygon, including vertices, points, faces, which you can check in Cinema 4D's Structure panel. But deformers contain no definition of polygons, they just calculate with the data from upstream and pass the result to the next deformer or to the final output; they don't keep the data within themselves. You can only access polygon information with object node in XPresso, and object nodes only accept original objects (an exception is the correction deformer, which is a fake object, and very slow). There aren't many ways to hijack the middle data.
With Houdini, it's a whole different story. Each node contains a complete copy of the polygonal definition, you can think of it as 4 objects in the picture above. When an SOP node receives some data from upstream, it calculates and stores the result within itself. There are four complete definitions of different objects and they rely on each other. The information dialogue on the right in the picture above shows the summary of data contained within the "mountain1" node (which is used to generate a noisy surface). All the SOP nodes can either generate data or calculate based on inputs. They will all store a complete copy of the object within themselves, and act independently to downstream objects. With this design, you can have access to all the middle data and source any node as many times as you want. This eliminates the need to create and manage many repetitive copies and backups. Because you can never destroy an object permanently by appending new nodes below, you would never encounter the XPresso problem described above.
Let’s take a look at another example that illustrates the difference between using Cinema 4D and using Houdini - in the case where you need to work with thousands of objects.
Usually, it's much more efficient to make a bunch of objects with MoGraph Cloner on MoGraph Matrix object, rather than working directly with Cloner, especially when you're trying to work with thousands of objects with MoGraph using many effectors.

Cinema 4D Cloner
For example, let's say you have a basic cube and you want to make some MoGraph with it. If you only use cloner itself to replicate 100 copies and then add effectors on top, what you are doing is making those effectors alter 100 cubes. Alternatively, if you create a matrix that has 100 points, add effectors on it, and then use cloner to replicate cubes based on the matrix, you get the same result, but all the effectors are working only on 100 points, which is much more lightweight, since cubes are much more complicated than a single point. As a result, you also get better responsiveness from the software. This figure of speech isn't necessarily accurate for what's actually happening behind the operations, but it tells a truth, manipulating point's transformation, rather than objects, are always much faster, which is exactly what most of the people are doing in Houdini with "copy to points" node: You create lots of points and assign a specific description of transformation on it, and then create lots of copies of an object to those points. Using Cloner alone can dramatically slow down your workflow if you are making massive numbers of clones invisible with effectors. Because Cloner needs to first create lots of real objects, and then effectors can remove them. While working with Matrix, Cloner only needs to create the exact number of points as what's left inside the Matrix object.
After using Houdini’s “copy to node” SOP node, I realized it’s exactly a cloner that works on a bunch of points (or “Matrix”, with Cinema 4D’s term) that are transformed, except you can get hundreds of times more objects, and remains stable and workable. By then, I thoroughly understood the cause of speed difference between these two ways of working with MoGraph Cloners.
“The Transform Node of Houdini”
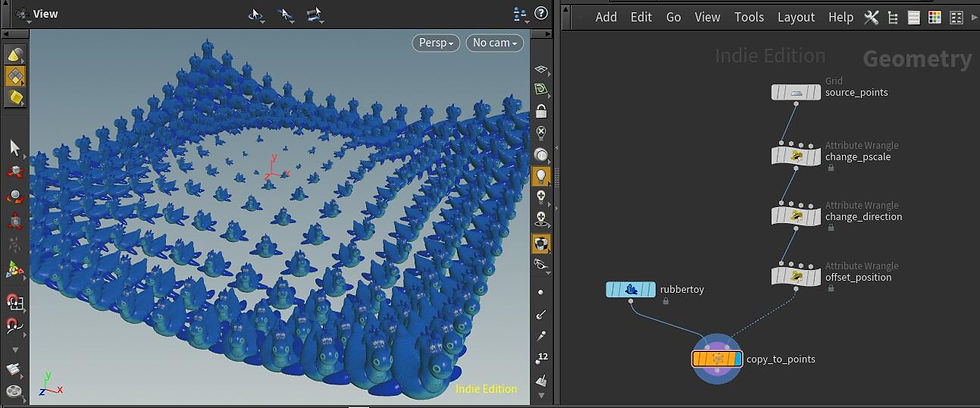
(all the right-hand side SOP nodes are working on simple individual points onto which rubber toy will be copied over)
So, when to use Houdini and when to use Cinema 4D? Generally speaking, I tend to do all the visual design and styleframes within Cinema 4D. I still prefer its ease of use. If I am sure there is something challenging for Cinema 4D, there will be a low-poly placeholder for later replacement. Once the concept is approved, I turn to Houdini for all the heavy-lifting, including special R&D, simulation and all sorts of things with which Cinema 4D struggles, like, self-interacted strings animation.

Would you like some digital Ramen? It’s all hand-keyframed. Well it’s simulated, just kidding :)
Cinema 4D has been struggling a lot with many effects, but considering its recent development of intuitive-yet-flexible voronoi fracture and MoGraph, and the help of third-party plugins like X-Particles that comes with VDB implementation, many things are doable within a certain degree of complexity. If you already own these plugins and they are working fine for your projects, keep using them. On the other hand, Houdini indie is very affordable ($399 for two years) yet offers almost no function limitation for personal usage, and no limitation of how you want things to be done and more.
For those jobs that need weird things, I might also do everything straight from within Houdini. It's a really fun playground for trying all sorts of random things.

The cheese was modeled and simulated with Houdini, which then got ported into Cinema 4D for animating, shading, lighting and final rendering.

Water droplets simulation in Houdini, rendering out the z-depth sequences as displacement maps in Cinema4D.

Huawei P20 Pro Twilight
All the smoke and most of the clothes were simulated or processed with the help of Houdini, and then rendered in Cinema.

(OnePlus 5)

(OnePlus 5)
Splines were simulated in Houdini, ported back to Cinema 4D for shading, lighting, and rendering. Maybe unnecessary, I just did it since I didn't know much about rendering in Houdini back then.

(Lenovo YOGA 920)

(Lenovo YOGA 920)
The sand scene alone was done solely in Houdini. Camera and pen animation was done with Cinema 4D, imported to Houdini for sand simulation and rendering. Animation can be tricky with Houdini's editor when complex camera rigs are involved, at least for me.
How to take the first step . . .
What are practical first steps that a Cinema 4D user can take in the Houdini world? I still remember the feeling of launching Houdini the first time: a complex and intimidating interface punched me in my face. I forced myself to get used to it. Although I succeed with that aspect, I still had no idea what I was doing after several weeks of fiddling around. I could make things by following tutorials online, but I couldn’t do anything more than that. One day after leaving Houdini for months (but I still watched Houdini tutorials from time to time, for fun), somehow the idea mentioned above of how SOP node is working and passing data jumped into my mind. I found all the stuff I’ve watched suddenly started to make sense. This marked the point where I could improvise and create new things from scratch with Houdini.
Some quick tips for those who are interested in taking their first leap:
-
There are several OPs (stands for operators) networks in Houdini for different purposes, don’t try to learn all of them simultaneously as this can be overwhelming. SOP should be the first and friendly stop. Once you get used to it, you can try VOP for better free control. Then the solver in SOP (which is packed with DOP, the dynamic operators) is fun to play with. The main difference between DOP and SOP is, unlike SOP where each node has independent object data, all the nodes in one DOP network share a same data pool, and calculate based on the previous frame using the shared data.
-
While VEX is powerful, it is not necessary to know when getting started. Lots of people make cool stuff with VOPs only, but it is true that you can have more flexibility if you know how to work with VEX. Move this to phase 2 of your learning process.
-
The Houdini Help manual is an invaluable resource for getting started and for acquiring basic knowledge. It includes some helpful well-written tutorials. Some of the explanations may not be easily understood, but there are lots of neat example files in help that demonstrate how to use a certain node.
-
Houdini’s community is very friendly and helpful. You will find lots of generous people sharing knowledge in places like:
-
odforce (http://forums.odforce.net/),
-
official forum (https://www.sidefx.com/forum/),
-
Facebook group (https://www.facebook.com/groups/HoudiniArtists/),
-
Discord chat (https://discord.gg/b8U5Hdy) and of course,
-
GridMarkets’ featured artist page (https://www.gridmarkets.com/featured-artists)
-
Here are some recommended tutorials for beginners from Cinema 4D, from some of my favourite artists:
This tutorial doesn’t only teach you how to make a geoboil, it also tells the difference of interface between Houdini and Cinema 4D, from a Cinema 4D user’s perspective. Simon Fiedler also has quite some other interesting comprehensive yet not scaringly hard Houdini tutorials on his vimeo.
Simon Holmedal talks a lot about the difference between Cinema 4D and Houdini. He demonstrated the limit of XPresso and MoGraph and how Houdini can easily surpass that.
Manual from Entagma shares the basic navigation in Houdini. Entagma’s other heavily-VEX-involved tutorial can be intimidating for beginners, but this particular one is easy to follow.
And don’t forget to check my Vimeo profile and see who I am following on Vimeo, where you will find lots of helpful resources.
Thank you for reading, I hope this article can be helpful for those Cinema 4D users who want to step into Houdini.
You can watch all the projects mentioned above on my Vimeo profile: https://vimeo.com/lewisorton
You can also find me on Behance: https://www.behance.net/LewisOrton
Lewis Orton 2018
By: Patricia Cornet
GridMarkets Marketing